Oreo Stuffed Red Velvet Brownies Recipe
Introduction
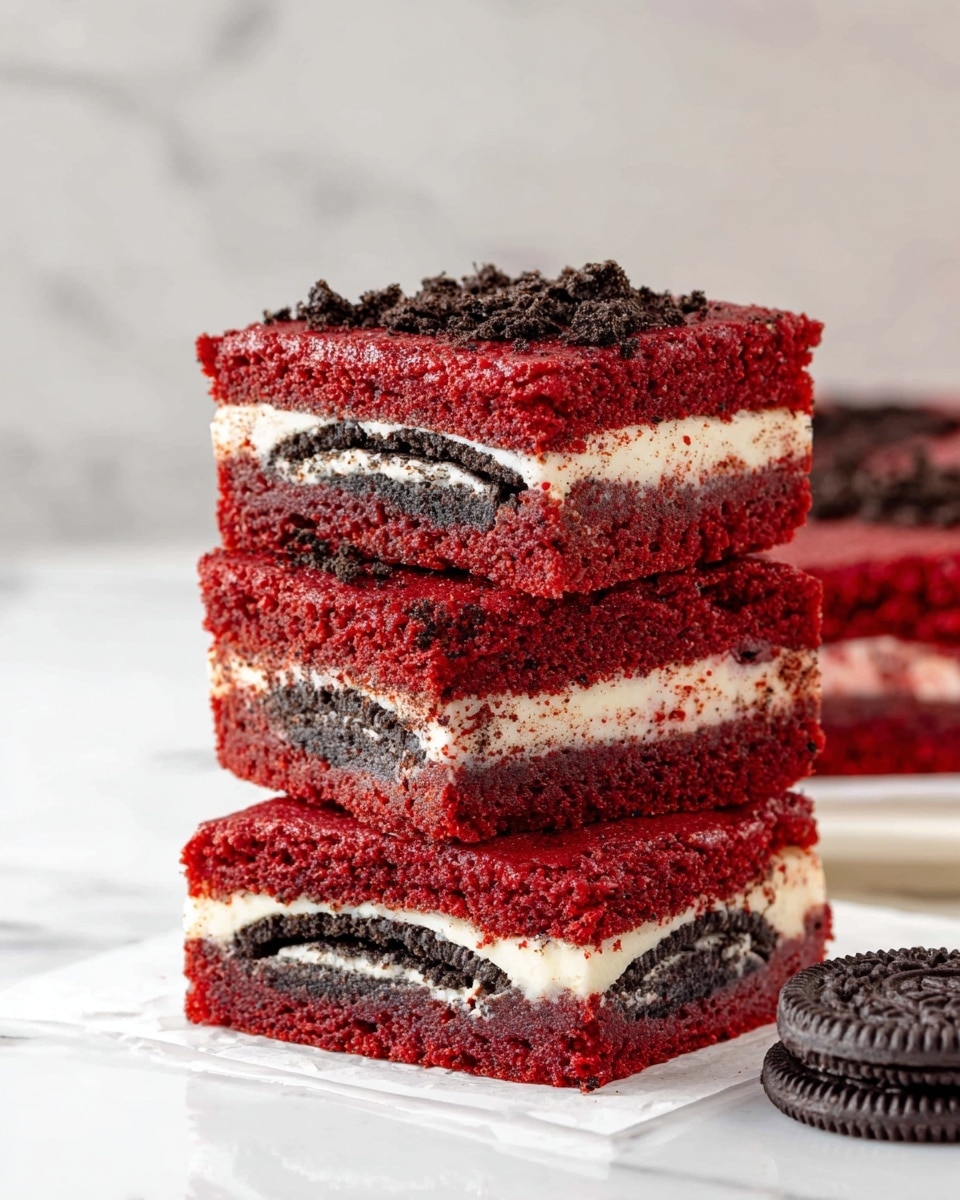
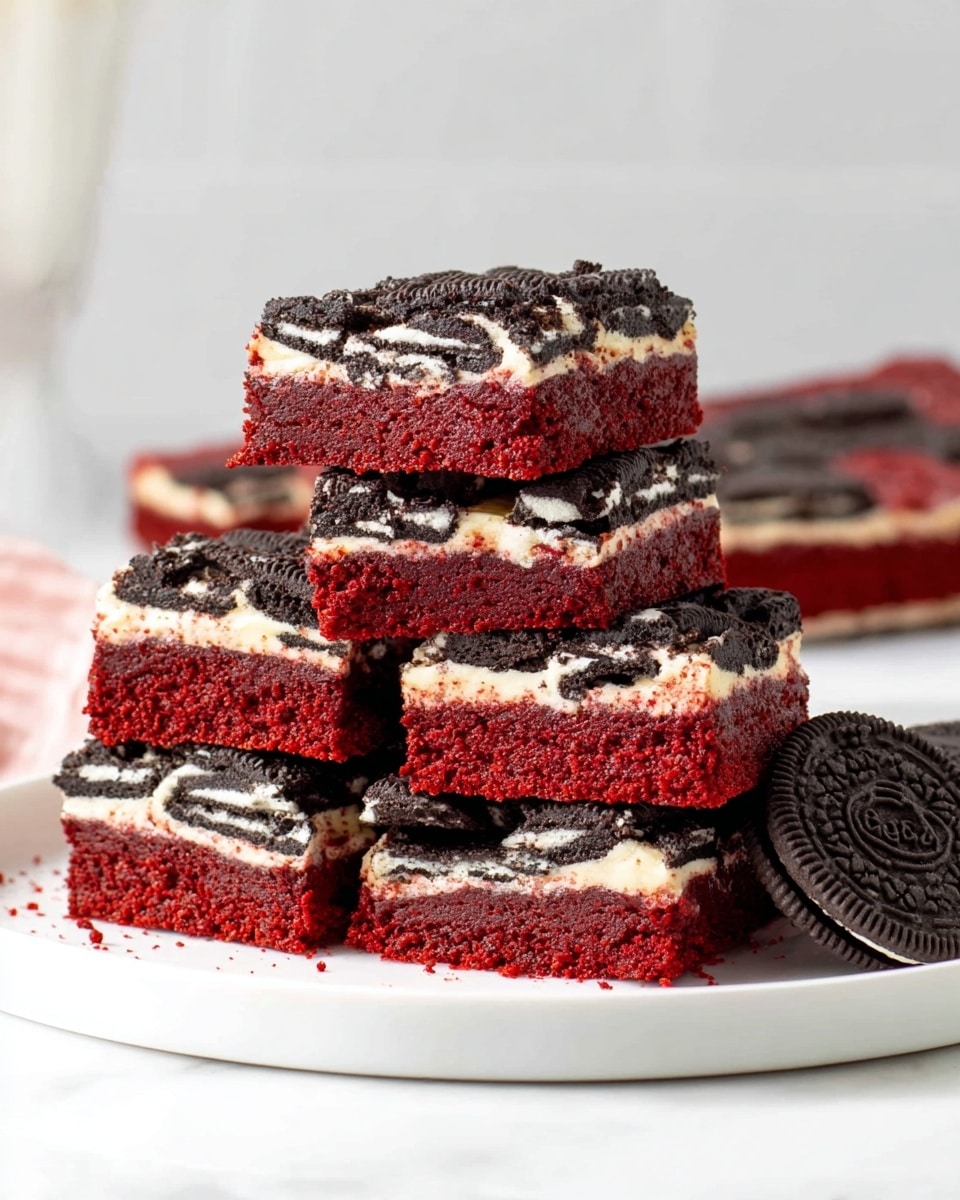
These Oreo Stuffed Red Velvet Brownies combine the rich, velvety flavor of red velvet with the classic crunch of Oreo cookies. Perfect for parties or indulgent treats, they offer a delightful surprise with every bite.
Ingredients
- 1 1/4 cup all-purpose flour (156 grams)
- 1/4 cup cocoa powder (22 grams)
- 1/4 teaspoon salt
- 3/4 cup unsalted butter (168 grams), melted and cooled slightly
- 1 1/4 cup granulated sugar (250 grams)
- 2 large eggs
- 1 tablespoon red food coloring (gel recommended)
- 2 teaspoons vanilla extract
- 1 teaspoon white vinegar (or distilled vinegar)
- 22 Oreo cookies (16 for layering, 6 for topping)
Instructions
- Step 1: Preheat the oven to 350°F (180°C). Line an 8×8 inch (20×20 cm) pan with parchment paper, leaving an overhang for easy removal. Lightly grease the pan to help the parchment stick, or grease the pan directly.
- Step 2: In a medium bowl, whisk together the flour, cocoa powder, and salt. Set aside.
- Step 3: In a large bowl, whisk the melted butter and sugar until no pools of butter remain on top.
- Step 4: Add the eggs, red food coloring, vanilla extract, and vinegar to the butter mixture. Whisk until smooth and uniformly red.
- Step 5: Gradually add the dry ingredients to the wet ingredients. If the cocoa powder is lumpy, sift it before mixing. Stir gently until no streaks or clumps remain.
- Step 6: Pour half of the batter into the prepared pan and spread evenly.
- Step 7: Arrange 16 Oreo cookies in 4 rows of 4 on top of the batter. Press them down lightly.
- Step 8: Spoon the remaining batter over the Oreo layer in small drops, then spread evenly to cover the cookies.
- Step 9: Chop or crumble the remaining 6 Oreos and sprinkle them evenly over the top.
- Step 10: Bake for 30-33 minutes until the top is set and a toothpick inserted comes out clean or with a few moist crumbs. Avoid underbaking to prevent gooey batter.
- Step 11: Allow the brownies to cool in the pan until it is no longer warm, about a few hours.
- Step 12: Use the parchment overhang to lift the brownies from the pan onto a cutting board. Slice with a thin, sharp knife. If you did not use parchment, slice carefully in the pan.
Tips & Variations
- Use gel food coloring for a vibrant red color without thinning the batter.
- Press the Oreos gently into the batter to keep them intact while baking.
- For extra texture, sprinkle chopped nuts along with the crushed Oreos on top.
- If you prefer fewer cookies, reduce the layers accordingly, but keep the crunch on top for contrast.
Storage
Store the brownies in an airtight container at room temperature for up to 3 days or refrigerate for up to a week. To reheat, warm individual slices gently in the microwave for 10-15 seconds for a soft, fresh-baked feel.
How to Serve
Serve this delicious recipe with your favorite sides.
FAQs
Can I use double-stuff Oreos for this recipe?
Yes, double-stuff Oreos work well and add extra creaminess between the layers.
How can I tell when the brownies are done baking?
The top should be set and a toothpick inserted should come out clean or with a few moist crumbs. Avoid removing it when coated with wet batter, which means they need more time.
PrintOreo Stuffed Red Velvet Brownies Recipe

Deliciously rich and moist red velvet brownies stuffed with a creamy layer of Oreo cookies. These Oreo Stuffed Red Velvet Brownies combine the classic flavors of red velvet cake and Oreos in a fudgy, layered treat that’s perfect for dessert lovers and Oreo fans alike.
- Prep Time: 15 minutes
- Cook Time: 30-33 minutes
- Total Time: 45-50 minutes plus cooling time
- Yield: 16 brownies 1x
- Category: Dessert
- Method: Baking
- Cuisine: American
Ingredients
Dry Ingredients
- 1 1/4 cup all-purpose flour (156 grams)
- 1/4 cup cocoa powder (22 grams)
- 1/4 teaspoon salt
Wet Ingredients
- 3/4 cup unsalted butter (168 grams), melted and cooled slightly
- 1 1/4 cup granulated sugar (250 grams)
- 2 large eggs
- 1 tablespoon red food coloring (gel preferred)
- 2 teaspoons vanilla extract
- 1 teaspoon white vinegar or distilled vinegar
Other Ingredients
- 22 Oreo cookies (16 for layering inside and 6 for topping)
Instructions
- Preheat and Prepare Pan: Preheat your oven to 350°F (180°C). Line an 8×8 inch (20×20 cm) pan with parchment paper leaving an overhang on the edges for easy removal, and grease lightly so the parchment sticks or simply grease the pan.
- Mix Dry Ingredients: In a medium bowl, whisk together the flour, cocoa powder, and salt until combined. Set aside.
- Combine Butter and Sugar: In a large bowl, whisk the melted butter and granulated sugar together until the mixture is smooth and no pools of butter remain.
- Add Eggs and Flavors: Whisk in the eggs, red food coloring, vanilla extract, and white vinegar into the butter-sugar mixture. Continue whisking until fully combined and the batter is bright red in color with no visible egg pieces.
- Incorporate Dry Ingredients: Gradually add the dry ingredients to the wet mixture. Sift first if the cocoa powder is lumpy. Gently whisk until just combined and no dry streaks remain.
- Layer Batter and Oreos: Pour half of the batter evenly into the prepared pan. Arrange 16 Oreo cookies in four rows of four on top of the batter, pressing them gently down.
- Top with Remaining Batter and Oreos: Spoon the remaining batter over the Oreo layer, distributing it evenly. Spread the batter into a smooth, even layer. Chop or crumble the remaining 6 Oreo cookies and sprinkle them over the top.
- Bake: Place the pan in the center of the preheated oven and bake for 30-33 minutes, or until the top is set and a toothpick inserted comes out clean or with just a few moist crumbs. Baking time may vary depending on your oven and desired gooeyness.
- Cool and Slice: Allow the brownies to cool in the pan until the pan is no longer warm, which may take a few hours. Use the parchment paper overhang to lift the brownies out of the pan and place them on a cutting board. Use a thin, sharp knife to slice into squares. If you did not use parchment, slice the brownies directly in the greased pan.
Notes
- For best results, use gel food coloring to achieve vibrant red color without altering the batter consistency.
- If you prefer, you can substitute regular Oreos with gluten free Oreos for a gluten free version.
- Ensure brownies are fully cooled before slicing to keep the layers intact.
- Baking time can be adjusted slightly for softer or firmer brownies based on your preference.
- Line the pan with parchment overhang to make removing the brownies easier and cleaner.
Keywords: Oreo brownies, red velvet brownies, stuffed brownies, dessert, chocolate dessert, Oreo dessert