Jelly Jar Chocolate Turtle Brownies Recipe
Introduction
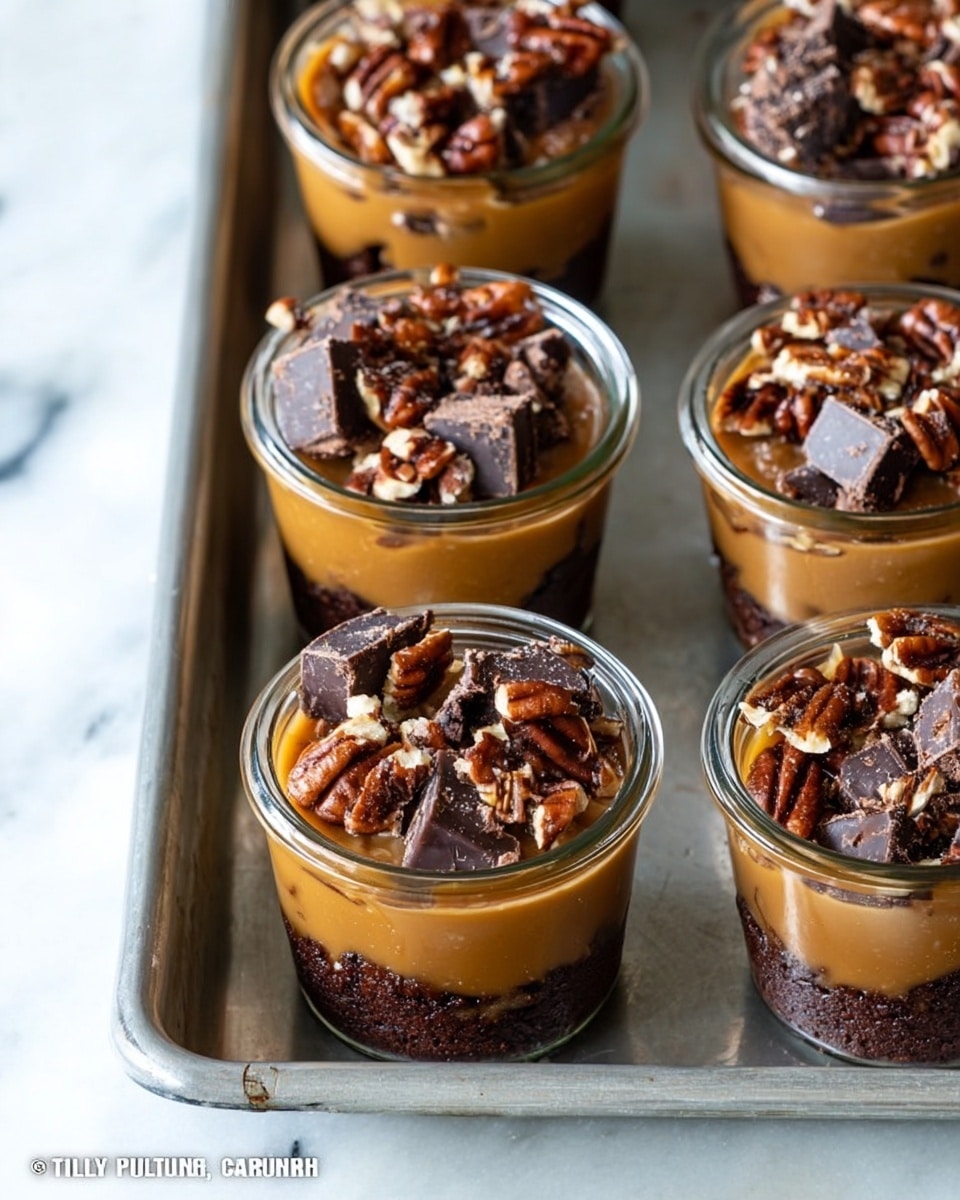
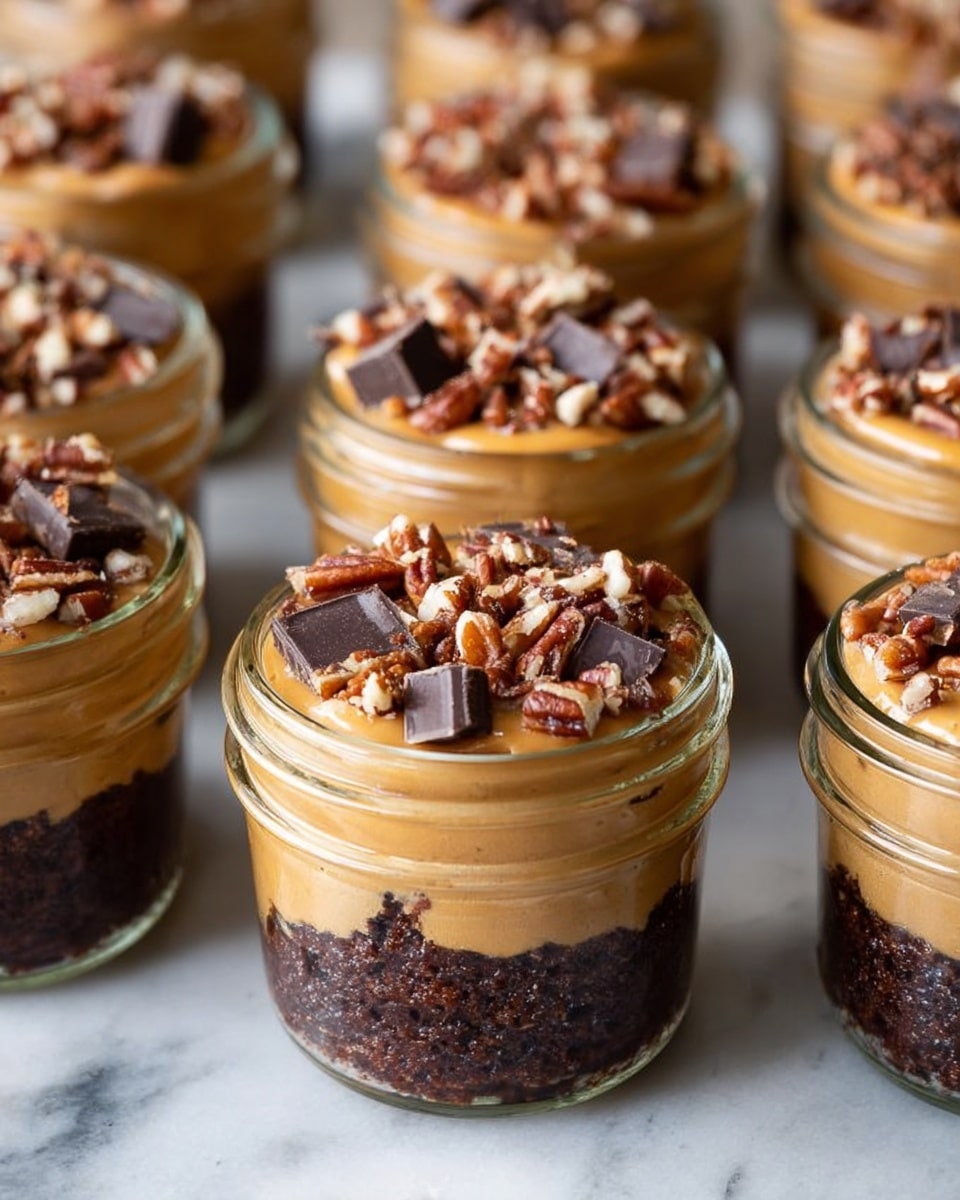
These Jelly Jar Chocolate Turtle Brownies are a delightful twist on classic brownies, baked directly in individual jelly jars for a fun presentation. With a rich caramel layer, gooey chocolate chunks, and crunchy pecans, they offer a perfect balance of textures and flavors.
Ingredients
- 12 4-ounce jelly jars
- Brownie mix (gluten-free or regular) plus ingredients called for in mix
- 1 11-ounce package caramels, unwrapped (Kraft brand recommended)
- 3 tablespoons heavy whipping cream
- ½ cup semi-sweet chocolate chunks or chocolate chips
- ½ cup roughly chopped pecans
Instructions
- Step 1: Preheat the oven to the temperature directed on your brownie mix package. Spray the 12 jelly jars with non-stick cooking spray and place them on a light-colored, rimmed baking sheet to ensure even cooking.
- Step 2: Prepare the brownie mix according to the package instructions. Divide the batter evenly among the jelly jars, filling each about halfway.
- Step 3: Bake the jars for 25 minutes. Test the brownies by inserting a toothpick; if it comes out clean, they are done. If not, bake for an additional 5 minutes and recheck.
- Step 4: Remove the jars from the oven and allow the brownies to cool completely on a cooling rack.
- Step 5: In a small heavy saucepan over low heat, combine the unwrapped caramels and heavy whipping cream. Stir constantly until the caramels melt into a smooth sauce. Work quickly as the caramel will start to solidify shortly.
- Step 6: Spoon the caramel sauce evenly over each cooled brownie, covering the top. Immediately sprinkle the chopped pecans over the caramel and gently press them in to secure.
- Step 7: Once the caramel begins to set (not too hot to avoid melting the chocolate), sprinkle the chocolate chunks over the pecans and press them lightly into the caramel. Serve immediately or cover each jar with plastic wrap until ready to enjoy.
Tips & Variations
- Use gluten-free brownie mix if you need a gluten-free dessert option.
- Swap pecans for walnuts or almonds for a different nutty flavor.
- For extra richness, add a pinch of sea salt on top of the caramel before adding chocolate chunks.
- Light-colored baking sheets help prevent the bottoms of the jars from cooking too quickly.
Storage
Store the brownies in their jars covered with plastic wrap or lids in the refrigerator for up to 4 days. Bring to room temperature before serving for the best texture. You can warm them briefly in the microwave (about 15 seconds) if you prefer a gooey warm treat.
How to Serve
Serve this delicious recipe with your favorite sides.
FAQs
Can I use homemade brownie batter instead of a mix?
Yes, homemade batter works well. Just be sure to divide it evenly among the jars and adjust baking time as needed since homemade recipes vary.
Are the jars safe to bake in?
Yes, use heat-safe jelly jars suitable for oven use. Glass jars designed for canning or jelly making typically work well, but avoid using thin or decorative glass that might crack under heat.
PrintJelly Jar Chocolate Turtle Brownies Recipe
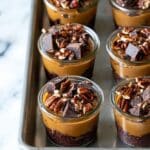
These Jelly Jar Chocolate Turtle Brownies are a delightful twist on traditional brownies, baked directly in individual jelly jars for easy serving and an elegant presentation. Featuring a rich, fudgy brownie base topped with luscious caramel, semi-sweet chocolate chunks, and crunchy pecans, these treats perfectly balance gooey sweetness and nutty texture. Ideal for parties, gifts, or a special dessert, they combine convenience with irresistible flavor.
- Prep Time: 15 minutes
- Cook Time: 25-30 minutes
- Total Time: 45 minutes
- Yield: 12 individual brownies 1x
- Category: Dessert
- Method: Baking
- Cuisine: American
- Diet: Gluten Free
Ingredients
Brownie Base
- Brownie mix (gluten-free or regular) with ingredients called for on the package
Caramel Topping
- 1 (11-ounce) package unwrapped caramels (such as Kraft brand)
- 3 tablespoons heavy whipping cream
Garnish
- ½ cup semi-sweet chocolate chunks or chocolate chips
- ½ cup rough chopped pecans
- Non-stick cooking spray (for preparing jars)
- 12 4-ounce jelly jars
Instructions
- Preheat and Prepare Jars: Preheat your oven to the temperature specified on your brownie mix package. Lightly spray twelve 4-ounce jelly jars with non-stick cooking spray and arrange them on a rimmed, light-colored baking sheet to ensure even baking and prevent overcooking.
- Mix Brownie Batter: Prepare the brownie mix according to the package instructions, incorporating any necessary ingredients. Once ready, evenly divide the batter among the prepared jelly jars, filling each jar about halfway full to allow room for rising.
- Bake the Brownies: Bake the jars for 25 minutes, then check for doneness by inserting a toothpick into the center of a brownie; if it comes out clean, they’re done. If not, continue baking in 5-minute increments, checking again until done as per the box instructions.
- Cool the Brownies: Carefully remove the baking sheet from the oven and transfer the jars to a cooling rack. Allow the brownies to cool completely before adding toppings to prevent melting and ensure proper layering.
- Prepare Caramel Sauce: In a heavy small saucepan, combine your unwrapped caramels with 3 tablespoons of heavy whipping cream. Heat over low heat, stirring constantly until the caramels are fully melted and smooth. Work quickly, as the caramel will harden rapidly once off the heat.
- Top with Caramel and Pecans: Spoon the warm caramel evenly over the cooled brownies in each jar, covering the surface. Immediately sprinkle the chopped pecans over the caramel, gently pressing them into the caramel to secure them firmly.
- Add Chocolate Chunks: Once the caramel starts to firm up a bit (to avoid melting), sprinkle the semi-sweet chocolate chunks over the top of each jarred brownie. Press the chocolate pieces lightly into the caramel to help them stick. Serve immediately or cover with plastic wrap until ready to serve.
Notes
- Use a light-colored baking sheet to avoid over-browning the brownies during baking.
- Ensure brownies are fully cooled before adding caramel to prevent the topping from melting excessively.
- Work quickly when spooning caramel on the brownies as it solidifies fast.
- Semi-sweet chocolate chunks add texture and flavor but can be substituted with chocolate chips if preferred.
- These brownies can be stored covered at room temperature for up to 2 days or refrigerated for longer freshness.
Keywords: brownies, jelly jar brownies, turtle brownies, caramel brownies, chocolate brownies, pecan brownies, gluten free brownies, individual brownies