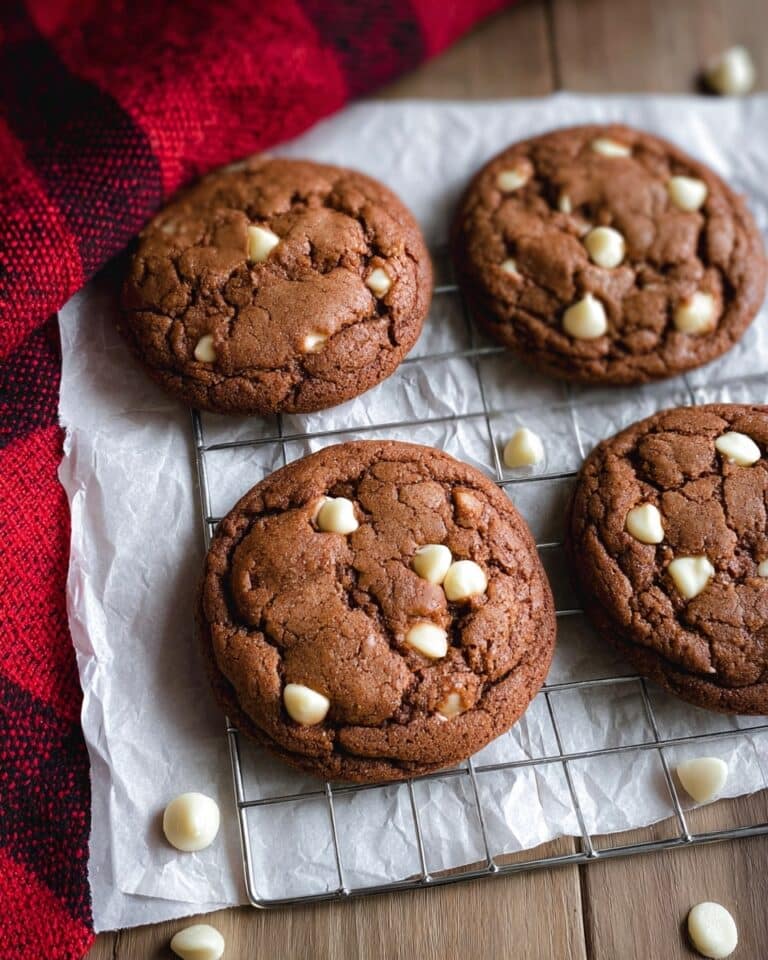
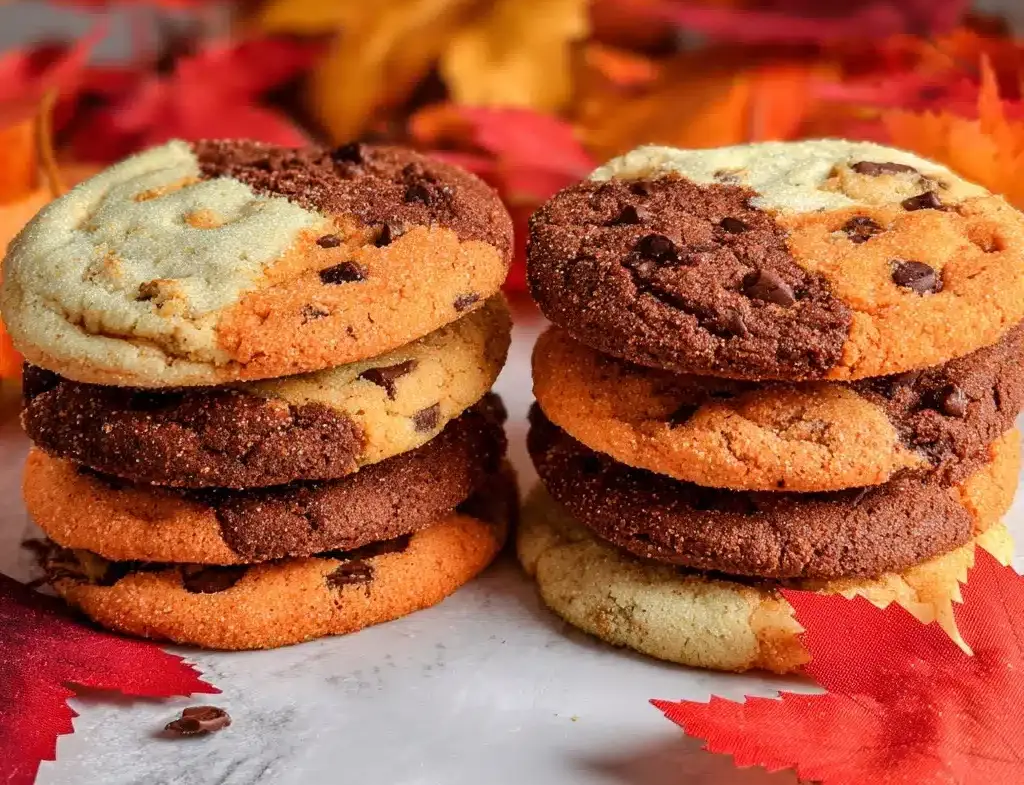
Harvest Marble Chocolate Chip Cookies Recipe
If you’re looking to delight your taste buds and impress your guests with a cookie that feels like a warm hug from fall itself, then Harvest Marble Chocolate Chip Cookies are exactly what you need. These cookies combine the comforting richness of chocolate chips with beautiful swirls of orange and brown dough, capturing the essence of autumn in every bite. The layers of buttery, sweet, and slightly spiced flavors come together to create a treat that’s as much fun to make as it is to eat. With their gorgeous marbled look and irresistibly soft texture, these cookies quickly become a seasonal favorite you’ll want to share again and again.

Ingredients You’ll Need
Every ingredient here plays a starring role in creating the flavor, texture, and charming appearance of these Harvest Marble Chocolate Chip Cookies. You’ll find that the pantry staples come together in a way that’s simple but absolutely essential to the magic of these treats.
- Butter, 1 cup (Sweet Cream, Salted): Adds a rich, creamy flavor and tender crumb to your cookies.
- Granulated Sugar, 1 cup: Provides sweetness and helps achieve that perfect crisp edge.
- Brown Sugar, 1/2 cup: Contributes moisture and a deep, caramel undertone that pairs beautifully with the chocolate.
- Large Eggs, 2: Bind everything together and give your dough structure with a fluffy lift.
- Vanilla Extract, 2 teaspoons: Elevates the overall flavor and adds a warm aromatic touch.
- Baking Soda, 1 teaspoon: Helps the cookies rise just enough and keeps them delightfully soft inside.
- Salt, 1/2 teaspoon: Balances sweetness and enhances all the other flavors.
- All-Purpose Flour, 2 3/4 cups: The foundation that shapes your dough and gives the cookie body.
- Nestle Toll House Chocolate Chips, 1 bag: The star ingredient for melty chocolate pockets in every bite.
- Food Coloring (Orange and Brown): Transforms plain dough into eye-catching swirls perfect for the harvest season.
How to Make Harvest Marble Chocolate Chip Cookies
Step 1: Cream the Butter and Sugars
Begin your cookie adventure by beating together softened butter with granulated and brown sugars until the mixture is silky smooth and fluffy. This step is crucial because it introduces air that results in a lighter, tender cookie, while the sugars add that signature sweet depth.
Step 2: Add Eggs and Vanilla Extract
Next, blend in the eggs and vanilla extract with your creamed butter mixture. Be sure to mix until the batter is well combined and airy, which will give your cookies that perfect chewy texture we all crave.
Step 3: Incorporate Baking Soda and Salt
Sprinkle in the baking soda and salt, folding them gently into your dough. These ingredients ensure just the right rise and help balance the sweetness for a nuanced flavor.
Step 4: Gradually Add Flour
Add your all-purpose flour little by little, mixing thoroughly after each addition until the dough comes together fully. This slow incorporation prevents overworking the dough, which keeps your cookies soft and tender instead of dense.
Step 5: Divide and Color Your Dough
Now comes the fun and artistic part! Split your dough into three equal parts. Use food coloring to tint one portion orange and another brown, leaving the third plain. This creates the harvest-inspired marbled effect that makes these cookies visually irresistible.
Step 6: Mix in the Chocolate Chips
Stir chocolate chips into each of the three dough portions. This ensures that every color you see also hides glorious pockets of melty chocolate.
Step 7: Form and Marble the Cookie Dough Balls
Take small portions (about 2 ounces each) from the orange, brown, and white doughs and press them together gently to form one cookie ball. The swirling of the colors here is what gives these cookies their stunning harvest marble appearance.
Step 8: Bake to Golden Perfection
Place your cookie balls on a baking sheet, gently pressing them down just a bit. Bake in a preheated 375 degree oven for 8 to 10 minutes. Look for golden edges and a set center as your signal that these beauties are ready to come out and cool.
How to Serve Harvest Marble Chocolate Chip Cookies
Garnishes
Although these cookies look like a work of art on their own, a light dusting of cinnamon or a sprinkle of flaky sea salt can add an extra cozy touch that enhances the harvest flavors. For special occasions, a small dollop of whipped cream or a drizzle of caramel sauce on the side makes a sweet presentation.
Side Dishes
Harvest Marble Chocolate Chip Cookies pair wonderfully with warm beverages like cider, pumpkin spice latte, or a classic glass of milk. These cozy companions complement the cookies’ sweet and slightly spiced notes, making every bite feel like a seasonal celebration.
Creative Ways to Present
Stack a few cookies on a rustic wooden platter surrounded by mini pumpkins and autumn leaves for a festive dessert display. You can also sandwich a scoop of vanilla or cinnamon ice cream between two cookies for a delightful fall-inspired treat that’s sure to wow your friends and family.
Make Ahead and Storage
Storing Leftovers
If you’re lucky enough to have leftovers, keep them fresh by storing your Harvest Marble Chocolate Chip Cookies in an airtight container at room temperature. They stay soft and delicious for up to a week, making it easy to enjoy them throughout the season.
Freezing
To save cookies for longer, freeze the baked cookies in a single layer on a baking sheet until firm, then transfer them to a resealable freezer bag. They can stay in the freezer for up to three months without losing their soft, chewy charm.
Reheating
When craving that just-baked warmth, simply microwave a cookie for 15 to 20 seconds or pop it in a 300 degree oven for 5 minutes. This quick reheat revives the gooey chocolate chips and soft texture beautifully.
FAQs
Can I use different types of chocolate chips in Harvest Marble Chocolate Chip Cookies?
Absolutely! Feel free to swap the traditional semi-sweet chocolate chips for dark chocolate, white chocolate, or even butterscotch chips. Each variation adds its own unique touch while maintaining the cookie’s classic charm.
Is it necessary to use food coloring for the marble effect?
While the food coloring really makes these cookies stand out visually, you can skip it if you prefer natural-colored dough. The cookies will still taste fantastic, but they won’t have the same vibrant harvest look.
Can I make the dough ahead of time?
Yes! The cookie dough can be made and stored in the refrigerator for up to 2 days before baking. This resting time can even deepen the flavors and improve the texture of your cookies.
What is the best way to prevent the colors from blending too much?
When forming your marbled cookie balls, gently press the different colored doughs together without overmixing. This way, each color stays distinct and creates that beautiful swirling effect once baked.
Are these cookies gluten-free?
As written, the recipe uses all-purpose flour which contains gluten. To make gluten-free Harvest Marble Chocolate Chip Cookies, substitute with a gluten-free flour blend suitable for baking, and adjust as needed for texture.
Final Thoughts
Harvest Marble Chocolate Chip Cookies are one of those special treats that brighten up any afternoon or festive gathering with their warm flavors and charming appearance. They invite creativity, celebrate the season, and offer the perfect balance of sweet, soft, and chocolatey in every bite. So why wait? Gather your friends or family, roll up your sleeves, and make these cookies a new beloved tradition that fills your home with irresistible aromas and happy smiles.
PrintHarvest Marble Chocolate Chip Cookies Recipe

Harvest Marble Chocolate Chip Cookies are a delightful twist on the classic chocolate chip cookie, featuring three distinct dough colors—white, orange, and brown—that come together to form a beautiful marbled effect. Perfect for fall celebrations, these cookies are rich, chewy, and filled with plenty of chocolate chips for a sweet, comforting treat.
- Prep Time: 15 minutes
- Cook Time: 10 minutes
- Total Time: 25 minutes
- Yield: 24 cookies 1x
- Category: Dessert
- Method: Baking
- Cuisine: American
- Diet: Vegetarian
Ingredients
Cookie Dough
- 1 cup Butter, softened to Room Temperature (Sweet Cream, Salted)
- 1 cup Granulated Sugar
- 1/2 cup Brown Sugar
- 2 Large Eggs
- 2 teaspoons Vanilla Extract
- 1 teaspoon Baking Soda
- 1/2 teaspoon Salt
- 2 3/4 cups All-Purpose Flour
Add-ons
- 1 Bag Nestle Toll House Chocolate Chips
- Orange Food Coloring
- Brown Food Coloring
Instructions
- Cream Butter and Sugars: In a mixer, beat the softened butter, granulated sugar, and brown sugar together until the mixture is light and fluffy, ensuring the sugars are well incorporated.
- Add Eggs and Vanilla: Add the two eggs and vanilla extract to the creamed mixture and mix until the batter is fluffy and homogeneous.
- Incorporate Leavening and Salt: Add the baking soda and salt to the mixture and blend thoroughly to evenly distribute the ingredients.
- Add Flour: Gradually add the all-purpose flour a little at a time, mixing continuously until the dough is fully incorporated and forms a smooth consistency.
- Divide and Color Dough: Separate the cookie dough into three equal portions. Use orange food coloring to dye one portion, brown food coloring for another, and leave the third portion white.
- Add Chocolate Chips: Mix a generous amount of Nestle Toll House chocolate chips into each portion of dough, ensuring an even distribution.
- Form Cookies: Take a 2-ounce ball of dough, combining equal parts of orange, brown, and white dough to create a marbled effect. Slightly press the ball down onto a prepared cookie sheet to flatten slightly.
- Bake: Bake the cookies at 375°F (190°C) for 8-10 minutes or until the edges turn golden brown. Remove from oven and allow to cool for a few minutes before transferring to a wire rack.
Notes
- Use gel food coloring for more vibrant and concentrated colors without changing the dough’s consistency.
- If desired, chill the dough for 30 minutes before shaping to make handling easier and prevent spreading during baking.
- Adjust baking time slightly based on your oven’s calibration and cookie size, watching for golden edges.
- Store cookies in an airtight container at room temperature for up to 5 days to keep them fresh.
- For a nutty twist, consider adding chopped walnuts or pecans in addition to chocolate chips.
Nutrition
- Serving Size: 1 cookie (approx. 40g)
- Calories: 180
- Sugar: 15g
- Sodium: 150mg
- Fat: 9g
- Saturated Fat: 5g
- Unsaturated Fat: 3g
- Trans Fat: 0g
- Carbohydrates: 22g
- Fiber: 1g
- Protein: 2g
- Cholesterol: 30mg
Keywords: harvest cookies, marble cookies, chocolate chip cookies, fall cookies, colored cookie dough