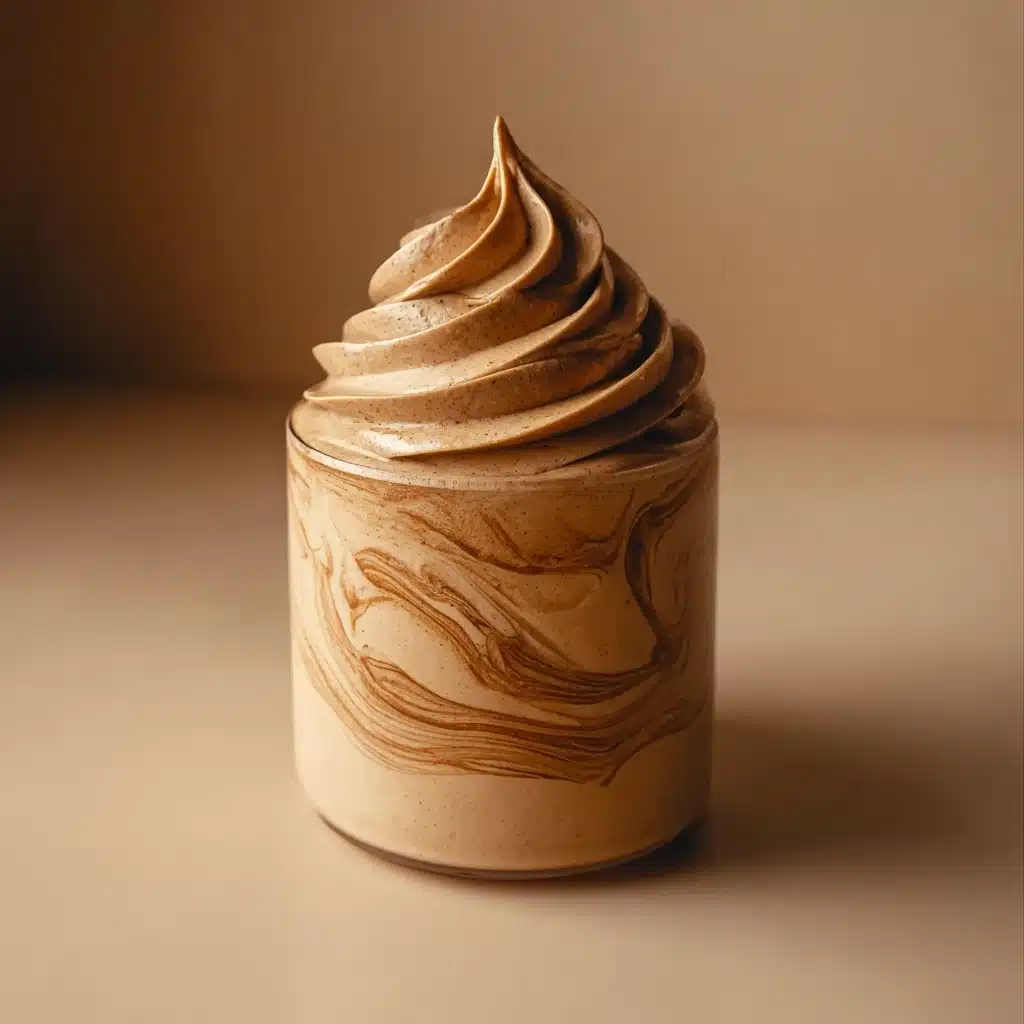
Ninja Creami Mocha Espresso Protein Ice Cream Recipe
If you’re a coffee lover who also loves to keep things healthy and delicious, then the Ninja Creami Mocha Espresso Protein Ice Cream is about to become your new favorite treat. This frozen delight marries the rich, bold flavors of espresso and chocolate with the nourishing benefits of protein powder, delivering a creamy, indulgent dessert that satisfies cravings without any guilt. Beyond just a snack, it’s a luscious experience that you can easily whip up at home with simple ingredients and your trusty Ninja Creami machine.

Ingredients You’ll Need
This recipe keeps things straightforward with essential pantry staples that come together beautifully to create the perfect blend of taste, texture, and energy. Each component plays a vital role in making this protein ice cream not only flavorful but satisfyingly creamy.
- 1 scoop chocolate protein powder: Adds a rich chocolate flavor and boosts protein content for a healthy indulgence.
- 1 spoonful cocoa powder: Deepens the mocha taste and enhances the dark chocolate notes.
- 1/2 cup chilled espresso or strong coffee: Introduces a bold coffee punch that defines the mocha character.
- 1 cup milk of choice (dairy or non-dairy): Contributes creaminess and helps adjust the texture to perfection.
- Optional: mini chocolate chips or nut butter for mix-ins: Elevate texture and add bursts of flavor with your favorite extras.
How to Make Ninja Creami Mocha Espresso Protein Ice Cream
Step 1: Combine the Ingredients
Start by placing your chocolate protein powder, cocoa powder, chilled espresso, and milk directly into a Ninja Creami pint container. Using chilled espresso is key here—it keeps the mixture cold so it freezes quickly and evenly, while the combination of powders ensures that mocha flavor really shines.
Step 2: Blend Until Smooth
Give everything a thorough whisk or a quick blend until absolutely smooth. The texture at this stage is crucial: no lumps should remain. This step guarantees that your ice cream has that velvety, rich consistency we’re aiming for.
Step 3: Freeze Overnight
Pop the pint into your freezer for at least 8 hours, or ideally overnight. Freezing fully solid is important for the Ninja Creami process to churn the mixture into that beautifully soft industrial ice cream texture we love.
Step 4: Process in the Ninja Creami
Once frozen solid, run your pint through the Ninja Creami using the ‘Lite Ice Cream’ or ‘Ice Cream’ setting. This step magically transforms your frozen block into creamy, fluffy ice cream that’s seriously satisfying.
Step 5: Adjust Texture if Needed
If you notice your ice cream comes out a little dry or crumbly, don’t fret. Simply re-spin the pint to develop a creamier finish—the Ninja Creami’s power lets you perfect the texture to your heart’s content.
Step 6: Add Mix-Ins
Now it’s time to get creative! Add mini chocolate chips or swirl in some nut butter, then use the ‘mix-in’ feature on your Ninja Creami to evenly distribute these delicious add-ons throughout your mocha protein ice cream.
Step 7: Scoop, Serve, and Enjoy!
All that’s left is to scoop this delightful, nutrient-packed ice cream into bowls or cones and enjoy every luxurious bite!
How to Serve Ninja Creami Mocha Espresso Protein Ice Cream
Garnishes
Elevate your serving game with a few simple garnishes. A sprinkle of cocoa powder or a dusting of finely ground espresso beans adds a gorgeous, aromatic touch. For visual appeal and extra indulgence, top with a dollop of whipped cream or crushed dark chocolate pieces.
Side Dishes
This protein-packed mocha ice cream pairs wonderfully with a crispy almond biscotti or freshly baked chocolate chip cookies. These sides add a delightful crunch and complement the luscious mocha flavor perfectly, making for a balanced and satisfying dessert experience.
Creative Ways to Present
For a fun twist, serve your Ninja Creami Mocha Espresso Protein Ice Cream in elegant martini glasses or coffee mugs to emphasize the coffee theme. You could also layer it with crushed granola and fresh berries in a parfait glass for a visually stunning and texturally dynamic treat that will impress every guest!
Make Ahead and Storage
Storing Leftovers
If you’re lucky enough to have leftovers, store them in an airtight container in the freezer to keep that creamy texture intact. Make sure to press a piece of plastic wrap directly on the surface before sealing to prevent ice crystals from forming.
Freezing
The Ninja Creami Mocha Espresso Protein Ice Cream freezes well for up to two weeks. After this time, though still tasty, it might start to lose its fresh flavor and creamy texture, so it’s best to enjoy it sooner rather than later for maximum indulgence.
Reheating
This ice cream is best enjoyed cold and fresh, so reheating is not recommended. If the texture becomes too hard after storage, simply let it sit a few minutes at room temperature or use the Ninja Creami’s respin function to bring back its luscious creaminess.
FAQs
Can I use instant coffee instead of espresso for this recipe?
Yes! Instant coffee can work as a quick alternative, but using freshly brewed and chilled espresso results in a richer, more authentic mocha espresso flavor that really makes the ice cream stand out.
Is this recipe suitable for dairy-free diets?
Absolutely. You can use any non-dairy milk like almond, oat, or coconut milk to keep this ice cream dairy-free without compromising on creaminess or taste.
How many servings does this recipe make?
This recipe yields about 2 to 3 servings depending on your portion size, making it perfect for a small family dessert or a healthy personal treat.
Can I replace the chocolate protein powder with vanilla or another flavor?
You can, but it will alter the mocha character of this protein ice cream. For the best mocha mocha experience, sticking with chocolate protein powder is recommended.
What makes using the Ninja Creami so special for this recipe?
The Ninja Creami’s unique churning technology transforms frozen mixtures into smooth, creamy ice cream without the need for added fats or sugars. It’s perfect for creating protein-packed frozen treats like this mocha espresso ice cream with a texture that rivals traditional ice cream.
Final Thoughts
There’s just something magical about the Ninja Creami Mocha Espresso Protein Ice Cream that feels like a cozy hug on a hot summer day or a little pick-me-up after your workout. It’s easy to make, nourishing, and incredibly delicious. If you love the rich flavors of coffee and chocolate packed into a creamy frozen delight, this recipe is a must-try. Go ahead, treat yourself—you deserve it!
PrintNinja Creami Mocha Espresso Protein Ice Cream Recipe

This Ninja Creami Mocha Espresso Protein Ice Cream is a delicious and creamy frozen treat that combines the rich flavors of chocolate and coffee with a healthy dose of protein. Perfect for a post-workout snack or a guilt-free dessert, it’s easy to make using the Ninja Creami and customizable with your favorite mix-ins like chocolate chips or nut butter.
- Prep Time: 10 minutes
- Cook Time: 0 minutes
- Total Time: 8 hours 10 minutes
- Yield: 1 pint (about 4 servings) 1x
- Category: Dessert
- Method: Ninja Creami Ice Cream Maker
- Cuisine: American
- Diet: Low Fat
Ingredients
Dry Ingredients
- 1 scoop chocolate protein powder
- 1 spoonful cocoa powder
Liquids
- 1/2 cup chilled espresso or strong coffee
- 1 cup milk of choice (dairy or non-dairy)
Optional Mix-ins
- Mini chocolate chips
- Nut butter
Instructions
- Combine Ingredients: Add the chocolate protein powder, cocoa powder, chilled espresso, and your choice of milk into a Ninja Creami pint container.
- Mix Thoroughly: Whisk or blend all ingredients until smooth, making sure there are no lumps so the texture turns out creamy.
- Freeze: Place the pint in the freezer and freeze overnight for at least 8 hours to ensure the mixture is fully solidified.
- Process in Ninja Creami: Use the ‘Lite Ice Cream’ or ‘Ice Cream’ setting on your Ninja Creami machine to process the frozen mixture into creamy ice cream.
- Adjust Texture: If the ice cream turns out too dry or crumbly, simply run the ‘re-spin’ function for a smoother consistency.
- Add Mix-ins: Incorporate mini chocolate chips or nut butter by adding them to the pint and using the ‘mix-in’ function on the Ninja Creami.
- Serve: Scoop the finished ice cream into bowls or cones and enjoy your homemade mocha espresso protein ice cream!
Notes
- Use chilled espresso or strong coffee to enhance the coffee flavor without melting the ice cream mix too quickly.
- Milk of choice can be dairy or any plant-based alternative to suit dietary preferences.
- For a vegan version, use plant-based protein powder and milk.
- Freezing overnight is crucial for the Ninja Creami to process the ice cream properly.
- Add mix-ins sparingly to avoid affecting the texture during the mixing process.
Nutrition
- Serving Size: 1/4 pint (about 4 oz)
- Calories: 150
- Sugar: 3g
- Sodium: 75mg
- Fat: 2g
- Saturated Fat: 0.5g
- Unsaturated Fat: 1g
- Trans Fat: 0g
- Carbohydrates: 15g
- Fiber: 2g
- Protein: 15g
- Cholesterol: 5mg
Keywords: Ninja Creami, protein ice cream, mocha espresso, low fat dessert, healthy ice cream, chocolate protein dessert, homemade ice cream